
A finished basement is only as usable as the path into it. In many Colorado homes, the basement stair is the tightest, darkest, and most code-sensitive part of the lower level—yet it’s also the first thing your family and guests experience. Smart basement staircase upgrades focus on measurable performance: safe rise/run, comfortable width, consistent steps, durable materials, better lighting, and future flexibility for moving furniture and adding rooms. This guide breaks down what matters most so your stair design supports your basement plan instead of limiting it.
What “basement staircase upgrades” actually includes
1) Geometry upgrades (the non-negotiables)
These are the structural and framing decisions that affect comfort, safety, and whether your stair passes inspection: total rise, riser height consistency, tread depth, landing size, and—most commonly missed—headroom at the opening and along the run.
2) Safety & code upgrades (handrails, guards, traction)
Better grip, fewer falls, and a cleaner look can coexist. Proper handrail height/shape, wall clearance, continuous runs, guard requirements at open sides, and slip-resistant treads are upgrades that help every age group—especially in socks during winter.
3) Experience upgrades (light, sound, and flow)
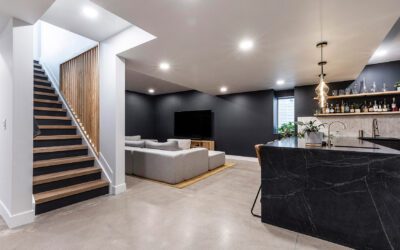
Good stairwells feel intentional: layered lighting, quieter steps, durable paint or wall protection, and a layout that aligns the stairs with the basement’s “main street” (family room, rec room, theater entry, wet bar zone, or kitchenette).
The big three: headroom, width, and step consistency
Colorado note: Many Front Range jurisdictions base stair requirements on the International Residential Code (IRC) with local amendments. Your exact requirements depend on where you live and the scope of work—your contractor should verify with your building department.
If your basement finishing plan includes a new bathroom, theater room, gym, or wet bar, stair decisions can affect everything from plumbing routes to furniture access. Before choosing finishes, confirm these performance benchmarks:
Baseline stair dimensions commonly referenced from the IRC
Many jurisdictions reference these typical minimums for residential stairs:
- Minimum clear width: often 36″ above the handrail height (wider feels better in real life).
- Minimum headroom: often 6′ 8″ measured from the stair nosing line—watch the floor opening and soffits.
- Max riser height / min tread depth: commonly 7 3/4″ riser and 10″ tread minimum.
- Handrail: typically required with 4+ risers; height commonly 34″–38″ above nosings.
Did you know? Quick facts that impact layout
Headroom is measured from the nosing line—not the tread surface. That means the tight spot is often right at the upper-floor opening, not mid-flight.
Small variations in riser height are trip magnets. Even “barely noticeable” inconsistency feels obvious when you walk it daily.
Stair upgrades can unlock better basement planning. A slightly relocated stair can turn a chopped-up basement into a clear family-room/rec-room zone with cleaner walls for a theater setup or entertainment wall.
Upgrade options: what you gain (and what it costs you in space)
| Stair Upgrade | Best For | Tradeoff | Resale/Usability Impact |
| Widening the stair / opening | Moving furniture, kid traffic, future aging-in-place | May reduce adjacent closet/hall area; may require reframing | High: feels “main-level quality” and removes a common buyer objection |
| Reworking rise/run for comfort | Daily use, safer footing, fewer falls | May change landing location; impacts basement wall layout | High: comfort is noticeable immediately |
| Improving headroom at the opening | Tall households; eliminating “duck under” spots | Can affect floor framing/soffits; needs careful planning | Very high: avoids the #1 “this feels cramped” complaint |
| Lighting + wall protection (wainscot, durable paint, corner guards) | Families, rentals, moving bulky items | Minimal; mostly finish decisions | Medium: protects the “new basement” look long-term |
| Quiet-step solutions (underlayment, carpet runner, tight fastening) | Theater rooms, nurseries, work-from-home basements | Material choices can increase maintenance (carpet) or cost (specialty underlayment) | Medium-to-high: makes basements feel calmer and higher-end |
Step-by-step: how to plan stair upgrades before finishing the basement
Step 1: Measure finished-floor to finished-floor height (not subfloor)
Stair layout mistakes often happen when the math ignores future flooring thickness upstairs or in the basement. If the basement will get LVP, carpet, or tile, include that in the stair design so the top and bottom steps match the rest.
Step 2: Check headroom where it fails most—at the rim of the opening
Stand on the lower treads and look up toward the upper-floor opening. If you’re considering a new soffit for ductwork, beams, or plumbing, headroom needs to be protected early—fixing it later can mean reframing or changing the entire stair run.
Step 3: Decide what the stairs should “land on” in the finished basement
For many Colorado homes, the best flow is landing into a family room or rec room rather than a hallway. If your plan includes a theater room, aim for a landing that doesn’t spill light directly into the viewing area. If you want a wet bar or kitchenette, consider a landing that naturally guides guests toward that zone without cutting through a private bedroom/bath area.
Explore inspiration and layouts here: Basement designs | Rec rooms | Family rooms | Theater rooms | Wet bars | Kitchenettes
Step 4: Upgrade lighting like you would for a hallway (not a closet)
A strong baseline is bright, even light on every tread and at landings. Practical upgrade options include: recessed lights aligned to avoid harsh shadows, wall sconces placed to maintain clearances, and 3-way switching (top and bottom) so nobody walks a dark stairwell.
Step 5: Choose durable, repair-friendly finishes
Basements get moved into: couches, treadmills, arcade cabinets, sectional pieces. Prioritize materials that can take impacts and be repaired without redoing the whole run—especially for the first 3–4 steps and the landing corners.
Colorado considerations: durability, dryness, and future flexibility
Along Colorado’s Front Range, a basement staircase isn’t just a connection—it’s a choke point for moisture control and long-term wear. While every home is different, planning often benefits from:
Moisture-aware materials at the bottom landing: basements can be seasonally humid; pick finishes that tolerate swings without swelling or delaminating.
Cleaner wall lines for multipurpose spaces: if you want a gym now but a bedroom later, stair placement and wall layout matter more than trendy finishes.
Traffic planning: a basement with a bathroom, kitchenette, or wet bar usually sees more daily use—so stair comfort becomes a “daily driver” feature, not an occasional one.
If you’re finishing in Colorado, explore: Basement finishing & remodeling in Colorado or for faster timelines and budget clarity: Express basement finishing.
Want a basement plan that doesn’t get boxed in by the stairs?
ElkStone Basements specializes exclusively in basement renovations—so your stair layout, headroom, lighting, and room flow are designed to work together from day one.
Get a Free Basement Consultation
FAQ: Basement staircase upgrades
Not always. Many projects keep the existing structure and focus on lighting, handrails, tread finishes, and wall protection. Rebuilds are most common when headroom is tight, the stair is uncomfortably steep, or the layout blocks the best room plan.
Headroom and cramped access. Homeowners often prioritize basement square footage and discover later that the stairwell feels tight, dark, or awkward for moving furniture—then fixes become expensive because framing and mechanicals are already in.
For most finished basements, opening into a main room (family room or rec room) improves flow and daily usability. A hallway can make sense when you’re prioritizing privacy for bedrooms or a dedicated guest suite, but it can also eat valuable square footage quickly.
The best finish is the one that matches your household’s traction and maintenance needs. Carpet runners can be quiet and grippy; wood or LVP treads look clean and are easy to wipe; rubberized treads can be great for gym-focused basements. Your decision should align with how the basement will actually be used (theater traffic, kids, pets, gym equipment).
Often, yes—and it’s a smart way to make the basement feel like a true extension of the home. The key is planning the stair landing and traffic pattern so guests don’t bottleneck, and confirming plumbing and mechanical routes early.
Glossary (quick definitions)
Headroom: The clear vertical space above stairs/landings, typically measured from the sloped line connecting tread nosings up to the ceiling or obstruction.
Nosing: The front edge of a stair tread that can project beyond the riser below; affects how tread depth is measured and how comfortable the step feels.
Riser: The vertical portion of a step. Uniform riser height is one of the most important safety factors.
Tread: The horizontal stepping surface. Deeper treads feel safer and more comfortable, especially for larger feet.
Landing: A level platform at the top, bottom, or between stair flights that provides a safe transition and space to turn or stop.

Recent Comments