Basement Home Theater Ideas That Actually Work: Layout, Acoustics, Lighting, and Power (Colorado Guide)

All Posts

Turn unused square footage into your favorite room—without the “echo chamber” or tangled-cord look

Colorado homeowners are rethinking basements as true lifestyle spaces: a theater for movie nights, a gaming lounge for weekends, or a hybrid “cinema + rec room” that still feels polished. The best basement home theaters aren’t built around a single gadget—they’re built around room shape, speaker positions, sound control, lighting, and the right electrical plan so everything performs the way it should from day one.

1) Start with the “theater triangle”: screen, seating, speakers

Most “basement home theater ideas” online focus on finishes. Finishes matter, but performance comes from geometry. Before you pick paint or a projector, map three anchors:

A. Screen wall
Choose the wall with the fewest doors/interruptions and the cleanest path for wiring. If you’re planning a large TV wall or projector screen, decide early so framing and blocking can support it.
B. Primary seating row (your “main listening position”)
Place your main row where it won’t be jammed against the back wall (that’s where bass tends to get boomy and surround effects can feel “behind your head” instead of around you). If space is tight, a deep sectional or a 3-seat row with a slim bar ledge behind can outperform cramped two-row seating.
C. Speaker layout (choose a target setup you can wire for)
Even if you start simple, it’s smart to prewire for more. Dolby’s home theater guidelines outline common configurations like 5.1.2, 5.1.4, and 7.1.4 so overhead effects (Atmos) feel convincing. If you’re investing in a dedicated room, many homeowners find four overhead channels (the “.4” in 5.1.4 or 7.1.4) to be a meaningful upgrade when the room allows it.

2) The most overlooked “feature” in a basement theater: acoustics

Basements often have hard surfaces, long rectangular dimensions, and open stairways—perfect conditions for echo, rattles, and muddy dialog. If your goal is crisp voices and immersive surround, plan acoustics as part of the build (not a later patch).

Sound control priorities (in order)
1) Stop sound leaks (door seals, solid core doors where practical, insulated wall cavities)
2) Reduce reflections (strategic acoustic panels, thick area rugs, upholstered seating, curtains)
3) Tame bass (sub placement planning, optional bass traps in corners, avoid hollow stage platforms that resonate)
Dialog clarity trick that works in real homes
If you’re doing an entertainment wall, build the center channel location intentionally (proper height, no tight cubby, breathing room). A center speaker stuffed into a small opening can create boxy sound that no receiver setting can truly fix.

3) Lighting: make it cinematic, but still usable

A basement theater fails fast when lighting is “all bright” or “all off.” The goal is layers so you can snack, clean up, or host guests without washing out the screen.

Lighting layers to consider
• Task lighting: wet bar/kitchenette counters, game table, steps
• Ambient lighting: dimmable recessed or surface fixtures on zones
• Accent lighting: cove lighting, sconces, backlit shelves, toe-kick LEDs
• Screen-safe control: dimmer scenes so you can hit “Movie Mode” instantly
Finish tip that improves picture quality
Use darker, low-sheen finishes near the screen wall to cut reflections. Even a great projector can look “gray” if your room bounces light right back onto the image.

4) Power, wiring, and ventilation: the “hidden” difference between DIY-looking and custom

Colorado homeowners often want theaters that feel sleek—no visible cords, no overheated equipment, no Wi‑Fi dead zones. That takes planning behind the walls.

System ElementWhat to Plan During Basement FinishingWhy It Matters
Dedicated circuitsSeparate power for AV rack/projector + general outlets where feasibleReduces nuisance trips and helps prevent hum/noise
Low-voltage pathwaysConduit or dedicated routes for HDMI/ethernet/speaker wireEasier upgrades later (new HDMI standards, added speakers)
NetworkHardwired ethernet to the theater/AV location (plus a strong access point plan)Reliable streaming, faster updates, fewer dropouts during movie night
AV rack ventilationVentilated closet or cabinet design; keep equipment accessibleHeat shortens equipment life and causes shutdowns
Future-proof speaker wiringPrewire for at least .4 overhead channels if ceiling allowsUpgrades later are far easier before drywall and paint
Basement reality check (important)
If your theater includes a bedroom (or you add a bedroom later), that can trigger additional code requirements such as emergency escape and rescue openings (egress). Always plan early so the layout, windows, and window wells don’t become an expensive surprise during construction.

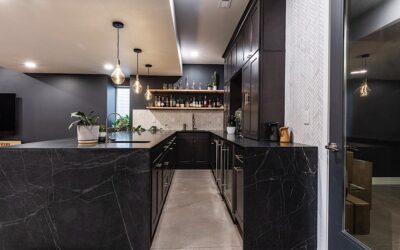
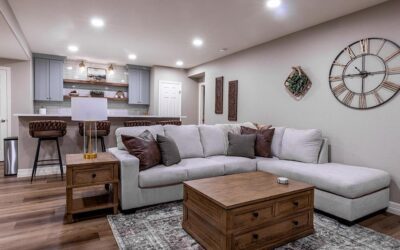
5) Theater + wet bar + rec room: a popular Colorado basement combo (and how to make it feel cohesive)

Along the Front Range, many homeowners want a theater experience without dedicating the whole basement to a single-use room. A smart “zone plan” can give you a cinematic viewing area while still supporting a wet bar, gaming, or a hangout space.

How to separate zones without building walls everywhere
• Use soffits and ceiling changes to visually define the theater area
• Use lighting scenes (bar brighter, screen area dim)
• Use flooring transitions (carpet in theater zone helps acoustics; durable surfaces elsewhere)
• Keep the screen wall “clean” so the room still photographs and feels premium
ElkStone-style upgrade that pays off
Build the entertainment wall like a system—not a piece of furniture. When framing, you can plan for blocking, hidden wire chases, proper speaker cavities, and clean access panels so upgrades don’t require drywall surgery later.

6) Local angle: Front Range basements and the “comfort + moisture + permits” checklist

Colorado basements can vary wildly—from newer builds with tall ceilings to older homes with tighter mechanical rooms and more moisture risk. Before you invest in premium audio/video, make sure the foundation is ready for a finished, comfortable space.

Comfort basics that protect your theater
• Humidity control: stable humidity helps protect speakers, electronics, and finishes
• Temperature balance: basements can run cooler; zoning or duct adjustments may be needed
• Door placement: stairway doors can help contain sound and improve comfort
Permits & life-safety planning
Many Colorado jurisdictions require plans that show items like smoke/CO alarms, electrical layouts, and (when applicable) egress window details for basement finishes. If your design includes a bedroom or you’re adding sleeping space later, plan those requirements upfront so your dream theater layout doesn’t conflict with safety items.

Ready to design a basement theater that looks clean and sounds incredible?

ElkStone Basements specializes exclusively in basement renovations—so your theater plan can be coordinated with framing, electrical, HVAC, acoustics, and finishes (without “oops” moments after drywall).

FAQ: Basement Home Theater Ideas (Homeowner Questions)

Is a dedicated theater room better than an open basement theater?
Dedicated rooms give you the best sound control and lighting. Open concepts can still be excellent if you plan zones (lighting scenes, acoustic finishes, and intentional speaker placement) and avoid seating pushed tight to boundary walls.
Should I choose a TV wall or a projector in my basement?
TVs excel in bright spaces and are simple to operate. Projectors can feel more “cinematic” at larger sizes, but they benefit from better light control and planning for mounting, wiring, and ventilation. Your ceiling height and viewing distance often decide this quickly.
What’s the best sound setup for a basement home theater?
“Best” depends on room size and seating. Many homeowners start with 5.1.2 or 5.1.4 and prewire for expansion. If your ceiling and layout allow, adding four overhead channels can make Atmos effects feel more realistic—especially in a dedicated viewing zone.
How do I stop echo in a basement theater?
Combine soft finishes (carpet/rug, upholstered seating, curtains) with purpose-placed acoustic panels—then address sound leaks with solid doors and sealing. The goal is to reduce reflections without making the room feel “dead.”
Do I need a permit to finish a basement theater in Colorado?
Many areas require permits for basement finishing, especially when electrical, plumbing, mechanical, or structural changes are involved. If you’re adding a bedroom, egress and life-safety items can also apply. A basement-focused remodeling team can help align the design with local requirements before construction starts.

Glossary (Helpful Theater + Basement Terms)

Atmos (Dolby Atmos)
A surround-sound format that adds overhead/height audio channels so sound can move above you (rain, aircraft, ambience).
Main Listening Position (MLP)
The primary seat/row used to align speaker angles, distances, and calibration.
Low-voltage wiring
Cables like speaker wire, ethernet, HDMI, and control wiring that should be planned separately from high-voltage electrical lines.
Egress (emergency escape and rescue opening)
A code-related emergency exit requirement that commonly applies when basements include sleeping rooms (and sometimes other finished spaces depending on jurisdiction and design).

Archives